


Monday, December 24, 2007
MarieBassDesigns Payment Screen
Send funds via PayPal to this e-mail address -
Or ask, and I will send an invoice,
Or click on logo below, then fill in amount including S/H
(Log in, or press Continue to pay without a log in)
CLICK BOX BELOW TO PAY:
(Make sure to send shipping address in comments section!)
Friday, November 9, 2007
Test Post - Buttons, etc
*** Alignment Using Table ***
 OCC w/ Ded HS, Aux Sync Jacks
*** Alignment Using Spacing ***
OCC w/ Ded HS, Aux Sync Jacks
New OCC-2 (while avail)... $60
Dedicated Hot Shoe....... $130
Aux Sync Jack One End..... $70
Aux Sync Jack Both ends.. $130
no_note -- Prompt customer to include a note with payment.
Default or 0: customer is prompted to include a note.
1: customer is not prompted to include a note. Optional
no_shipping -- Prompt customer for shipping address.
Default or 0: customer is prompted to include a shipping address.
1: customer is not asked for a shipping address.
2: customer must provide a shipping address. Optional
image_url -- The URL of the 150x50-pixel image displayed as your logo in the upper left corner of PayPal's pages. Must be URL-encoded.
Default: your business name (if you have a Business account) or your email address (if you have Premier account). Optional
Add To Cart - Plain
(eliminate all end of line CR/LF to conserve space)
A****TOP OF CODE*******************************************************
A----BOT OF CODE-------------------------------------------------------
Add To Cart - Plain
(All end of line CR/LF Removed to Conserve Space)
B***TOP OF CODE*******************************************************
B----BOT OF CODE-------------------------------------------------------
Add To Cart - Drop Down Box and Text Box Options - Vertical Align
(eliminate all end of line CR/LF to conserve space)
C****TOP OF CODE*******************************************************
C----BOT OF CODE-------------------------------------------------------
Add To Cart - Drop Down Box and Text Box Options - Vertical Align
(All end of line CR/LF Removed to conserve space)
C1****TOP OF CODE*******************************************************
C1----BOT OF CODE-------------------------------------------------------
Add To Cart - Drop Down Box and Text Box Options - Horizontal Align
(All end of line CR/LF Removed to conserve space)
C2****TOP OF CODE*******************************************************
C2----BOT OF CODE-------------------------------------------------------
View Cart - Plain
(eliminate all end of line CR/LF to conserve space)
D****TOP OF CODE*******************************************************
D----BOT OF CODE--------------------------------------------------
************************************************************************
************************************************************************
View Cart - Plain
(All end of line CR/LF Removed to conserve space)
F****TOP OF CODE*******************************************************
F----BOT OF CODE--------------------------------------------------
https://www.paypal.com/en_US/i/btn/btn_cart_LG.gif
https://www.paypal.com/en_US/i/btn/x-click-but10.gif
Small Rectangular Button
G****TOP OF CODE*********************************************************
************************************************************************
From Custom 6 Output Pre-Trigger Cable (CR/LF Back in Place)
************************************************************************
************************************************************************
************************************************************************
From Custom 6 Output Pre-Trigger Cable (CR/LF REMOVED)
************************************************************************
************************************************************************
************************************************************************
New Button from PayPal (w/ CR/LF Text, 2 buttons, No Table)
Z3**TOP OF CODE********************************************************
Z3--BOT OF CODE-------------------------------------------------------
Z3--------------------------------------------------------------------
************************************************************************
START: Text Box, 2 Buttons (w/o CR/LF, No Table)
Z2***TOP OF CODE********************************************************
Z2---BOT OF CODE-------------------------------------------------------
END: Text Box, 2 Buttons (w/o CR/LF, No Table)
Z2---------------------------------------------------------------------
************************************************************************
START: Text Box, 2 Buttons, w/ CR/LF
Z1***TOP OF CODE********************************************************
Z1---BOT OF CODE-------------------------------------------------------
END: Text Box, 2 Buttons, w/ CR/LF
Z1---------------------------------------------------------------------
X***********************************************************************
START: 1 Button, No CR/LF
X****TOP OF CODE********************************************************
X----BOT OF CODE-------------------------------------------------------
END: 1 Button, No CR/LF
X----------------------------------------------------------------------
Y***********************************************************************
START: Text Box, 1 Button, No CR/LF
Y****TOP OF CODE********************************************************
Y----BOT OF CODE-------------------------------------------------------
END: Text Box, 1 Button, No CR/LF
Y----------------------------------------------------------------------
Z***********************************************************************
START: Text Box, 2 Buttons, No CR/LF
Z****TOP OF CODE********************************************************
Z----BOT OF CODE-------------------------------------------------------
END: Text Box, 2 Buttons, No CR/LF
Z----------------------------------------------------------------------
F***********************************************************************
START: View Cart - Plain (No CR/LF)
F****TOP OF CODE*******************************************************
F----BOT OF CODE-------------------------------------------------------
END: View Cart - Plain (No CR/LF)
F----------------------------------------------------------------------
2***********************************************************************
START: Drop Down Box, Text Box (No Table)(Vert Align)
2****TOP OF CODE********************************************************
Drop-Down Menu
Text Box
2----BOT OF CODE SECTION-----------------------------------------------
1***********************************************************************
START: Drop Down Box, Text Box (No Table) (Horiz Align)
1****TOP OF CODE********************************************************
Drop-Down Menu Text Box
1----BOT OF CODE SECTION-----------------------------------------------
0***********************************************************************
START: Table w/ Drop Down Box, Text Box
0****TOP OF CODE********************************************************
0----BOT OF CODE SECTION-----------------------------------------------
END: Table w/ Drop Down Box, Text Box
0----------------------------------------------------------------------
START: TO BE CUSTOMIZED:
------------------------
---------------------------------------------------------------------------------
---------------------------------------------------------------------------------
-----All three lines are same length---------------------------------------------
END: TO BE CUSTOMIZED:
 OCC w/ Ded HS, Aux Sync Jacks
| New OCC-2 (while avail) | $60 |
| Dedicated Hot Shoe | $130 |
| Aux Sync Jack One End | $70 |
| Aux Sync Jack Both ends | $130 |
*** Alignment Using Spacing ***
OCC w/ Ded HS, Aux Sync JacksNew OCC-2 (while avail)... $60
Dedicated Hot Shoe....... $130
Aux Sync Jack One End..... $70
Aux Sync Jack Both ends.. $130
no_note -- Prompt customer to include a note with payment.
Default or 0: customer is prompted to include a note.
1: customer is not prompted to include a note. Optional
no_shipping -- Prompt customer for shipping address.
Default or 0: customer is prompted to include a shipping address.
1: customer is not asked for a shipping address.
2: customer must provide a shipping address. Optional
image_url -- The URL of the 150x50-pixel image displayed as your logo in the upper left corner of PayPal's pages. Must be URL-encoded.
Default: your business name (if you have a Business account) or your email address (if you have Premier account). Optional
Add To Cart - Plain
(eliminate all end of line CR/LF to conserve space)
A****TOP OF CODE*******************************************************
A----BOT OF CODE-------------------------------------------------------
Add To Cart - Plain
(All end of line CR/LF Removed to Conserve Space)
B***TOP OF CODE*******************************************************
B----BOT OF CODE-------------------------------------------------------
Add To Cart - Drop Down Box and Text Box Options - Vertical Align
(eliminate all end of line CR/LF to conserve space)
C****TOP OF CODE*******************************************************
C----BOT OF CODE-------------------------------------------------------
Add To Cart - Drop Down Box and Text Box Options - Vertical Align
(All end of line CR/LF Removed to conserve space)
C1****TOP OF CODE*******************************************************
C1----BOT OF CODE-------------------------------------------------------
Add To Cart - Drop Down Box and Text Box Options - Horizontal Align
(All end of line CR/LF Removed to conserve space)
C2****TOP OF CODE*******************************************************
C2----BOT OF CODE-------------------------------------------------------
View Cart - Plain
(eliminate all end of line CR/LF to conserve space)
D****TOP OF CODE*******************************************************
D----BOT OF CODE--------------------------------------------------
************************************************************************
************************************************************************
View Cart - Plain
(All end of line CR/LF Removed to conserve space)
F****TOP OF CODE*******************************************************
F----BOT OF CODE--------------------------------------------------
https://www.paypal.com/en_US/i/btn/btn_cart_LG.gif
https://www.paypal.com/en_US/i/btn/x-click-but10.gif
Small Rectangular Button
G****TOP OF CODE*********************************************************
************************************************************************
From Custom 6 Output Pre-Trigger Cable (CR/LF Back in Place)
************************************************************************
************************************************************************
************************************************************************
From Custom 6 Output Pre-Trigger Cable (CR/LF REMOVED)
************************************************************************
************************************************************************
************************************************************************
New Button from PayPal (w/ CR/LF Text, 2 buttons, No Table)
Z3**TOP OF CODE********************************************************
Z3--BOT OF CODE-------------------------------------------------------
Z3--------------------------------------------------------------------
************************************************************************
START: Text Box, 2 Buttons (w/o CR/LF, No Table)
Z2***TOP OF CODE********************************************************
Z2---BOT OF CODE-------------------------------------------------------
END: Text Box, 2 Buttons (w/o CR/LF, No Table)
Z2---------------------------------------------------------------------
************************************************************************
START: Text Box, 2 Buttons, w/ CR/LF
Z1***TOP OF CODE********************************************************
Z1---BOT OF CODE-------------------------------------------------------
END: Text Box, 2 Buttons, w/ CR/LF
Z1---------------------------------------------------------------------
X***********************************************************************
START: 1 Button, No CR/LF
X****TOP OF CODE********************************************************
X----BOT OF CODE-------------------------------------------------------
END: 1 Button, No CR/LF
X----------------------------------------------------------------------
Y***********************************************************************
START: Text Box, 1 Button, No CR/LF
Y****TOP OF CODE********************************************************
Y----BOT OF CODE-------------------------------------------------------
END: Text Box, 1 Button, No CR/LF
Y----------------------------------------------------------------------
Z***********************************************************************
START: Text Box, 2 Buttons, No CR/LF
Z****TOP OF CODE********************************************************
Z----BOT OF CODE-------------------------------------------------------
END: Text Box, 2 Buttons, No CR/LF
Z----------------------------------------------------------------------
F***********************************************************************
START: View Cart - Plain (No CR/LF)
F****TOP OF CODE*******************************************************
F----BOT OF CODE-------------------------------------------------------
END: View Cart - Plain (No CR/LF)
F----------------------------------------------------------------------
2***********************************************************************
START: Drop Down Box, Text Box (No Table)(Vert Align)
2****TOP OF CODE********************************************************
Drop-Down Menu
Text Box
2----BOT OF CODE SECTION-----------------------------------------------
1***********************************************************************
START: Drop Down Box, Text Box (No Table) (Horiz Align)
1****TOP OF CODE********************************************************
Drop-Down Menu Text Box
1----BOT OF CODE SECTION-----------------------------------------------
0***********************************************************************
START: Table w/ Drop Down Box, Text Box
0****TOP OF CODE********************************************************
| Drop-Down Menu | |
| Text Box |
0----BOT OF CODE SECTION-----------------------------------------------
END: Table w/ Drop Down Box, Text Box
0----------------------------------------------------------------------
START: TO BE CUSTOMIZED:
------------------------
---------------------------------------------------------------------------------
---------------------------------------------------------------------------------
-----All three lines are same length---------------------------------------------
END: TO BE CUSTOMIZED:
Saturday, November 3, 2007
Removed Items from Main site
 580 EX II - Re-Wired PC Jack
PC jack or mini jack is operational in all modes (Master-Manual included)
$60 (S/H $13)
Sync Cord: ScrewLock PC to straight mini plug: $25
 The PC jack can be replaced with a mini or sub-mini jack. The corresponding sync cord is then included: $25
 Canon Flash Auxillary Sync Mod
Includes One Straight Cable
$60 (S/H $13)
6' coiled cable instead of straight $20 (w/ clip)
Safety clip (attaches to PW & prevents plug pullout): $5
GREAT FOR LONGER CABLES!!!
Now Mods for 580 EX II also!
One extra standard cable: $7 (limit 1 at this price, normally $15)
Must be ordered with flash mod - GREAT FOR BACKUP
 Olympus and Sunpack Units!
Includes one straight cable: $60

Canon 430 EX Units
Includes one straight cable: $70
Can be sent in or as Field Swap
Thursday, November 1, 2007
Lens Mounted Trigger - Redo Test
BE YOUR OWN 2nd SHOOTER!
Fully tested, works great and is currently in use by my photographer son, Justin Bass, and many others!
Uses, Options, and Scenarios
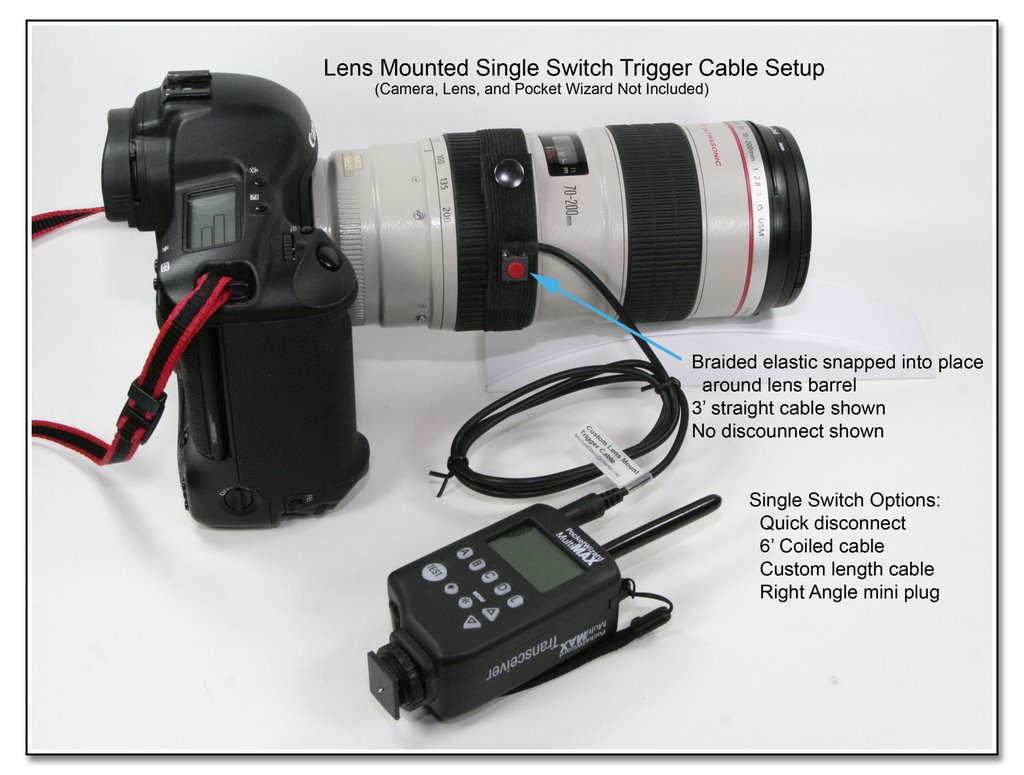
 The Lens Mounted Trigger - Single Switch Base Model (with up to a 3 foot straight cable), ending in a straight mini plug is $65. The 3/4 inch wide elastic is 9 inches long from snap to snap, and an extension is available for $10 to fit around the large lens hood of the big 400 f2.8 lens. A RA (right angle) molded mini plug is also available for an additional $5. The Quick Disconnect can be added into the cable for $20.
 This image shows the Lens Mounted Trigger - Single Switch with the Coiled Cord and Safety Clip. The coiled cord and safety clip adds $25 to the base price of $65, for a total of $90. The optional Large Lens Extension is $10, but is only needed for the very largest diameter lens hoods. The Quick Disconnect can be added into the cable for $20.
 The Lens Mounted Trigger - Dual Switch Band (with up to two 3 foot straight cables), ends in two straight mini plugs, and is $85. The one inch wide elastic is 9 inches long from snap to snap, and an extension is available for $10 to fit around the large lens hood of the big 400 f2.8 lens. RA (right angle) molded mini plugs are also available for an additional $5 (each). The Quick Disconnect RJ11 plug / RJ45 coupler can be added into the cable for $20.
 Here the Lens Mounted Trigger - Dual Switch Band ($85) ends in the RJ11 plug connecting to a RJ45 coupler. This disconnect set is an additional $20, and the dual ended coiled cord seen here is $45. A 4 conductor mini plug / mini jack can be used instead of the RJ11 / RJ45 for an additional $5.
 The Lens Mounted Trigger - Single Switch Base Model is $65 with the short cord and the molded plug as seen here. The specialty adapter is a mini inline jack to HH plug and is $25. The same adapter is also available ending in a HH jack (female outlet).
 The Stick-On Trigger is $65, and can be made in a length up to 3 feet, with either a RA or a straight mini plug. This Velcro pad can mount to the camera body hand grip or anywhere else you can think of with the included Velcro or foam mounting pads. As in the Lens Mounted Trigger - Single Switch with the Coiled Cord and Safety Clip the coiled cord and safety clip adds $25, and the disconnect adds $20.
 Here you can see some variations of the Stick-On Trigger. You can have a Single Switch model that has Dual positions with a custom spacing, or a Dual Switch model that has Dual positions with a custom spacing. The image shows each version ending in a RJ11 plug as the disconnect which is $20, although the mini plug / mini jack can be used instead if desired. In addition to the base price of $65, the Dual Position Single Switch (2 switches) will add $20, while the Dual Position Dual Switch (4 switches) will add $45.
Lens Mounted Trigger - Use:
Use this device to trigger a Pocket Wizard while holding another camera. You can fire off pictures with the remote camera while holding your main camera. The top picture shows the Single Switch Band model with an attached 3' straight cable ending in a molded miniphone plug to trigger a Pocket Wizard which will cause the firing of a remote camera without putting down the camera the switch band is mounted to! The red button switch has a good tactile feel, and is easy to locate. Easy on, easy off; easy positioning for either side of lens! (Shown is Right side model, normally for left index finger triggering. Left side model has wire coming off opposite side for thumb triggering! Buyer can request left side model, if desired)
You no longer have to reach for the test button on your Pocket Wizard!
S/H $10 USA $25 Global
No add'l S/H when combined with Pre-Trigger Cable
(or when combined with a flash mod)
For e-Bay RF Transmitters / Receivers:
Replace mini plug with 1/4" inline jack: (+$5)
Most popular / requested options:
1) Replace the 3' straight cable with the 6' coiled cable. The Pocket Wizard can then be placed in a pouch or in a pocket and out of the way. (Only $20 additional to base price for the Single Switch Band) Safety clip is most useful to help prevent plug pullout, and relieve the stress and strain on the plug / jack connection. It is not field installable, and must be specified at time of order.
2) Add quick disconnect near elastic switch band. You don't have to fumble to unplug the wire from the Pocket Wizard when putting down your camera. (Only $20 additional to base price for either Single or Dual Switch Bands). The quick release can be place on either the 3' single straight cable, 6' single coiled wire, or 6' double coiled cable. For the Single Switch models, the quick disconnect can either be the RJ11 connector with the RJ45 coupler, or the mini plug / mini jack combination. For the Dual Switch models, a 4 conductor mini plug / mini jack can be used instead of the RJ11 / RJ45 for an additional $5.
Wedding Scenario:
Shooting a wedding ceremony, and you are down the aisle using long and wide glass, while your remote setup is mounted on a tripod or clamps near the front to face the bride, overlooking the groom's shoulder (or also in a balcony, as when using the dual switch model). Press the Lens Mounted Trigger Switch to get every closup expression of the bride, while you are taking the distance shots from down the aisle. You never have to lose the field of view from your handheld camera, and both cameras will operate independantly. It does take a bit of practice, but the results are awesome in getting the same expression from the two different angles! Using the coiled cable will allow the Pocket Wizard to be placed in a pouch along with the external battery for the flash, and the quick disconnect will allow you to easily put the camera down without having to unsnap the Switch Band.
Sports Scenario:
Set up a remote behind each goal (i.e. soccer, basketball, etc), and when you are shooting on the sidelines, you can get either goal action by pressing one button or the other on your Lens Mounted Trigger Switch Dual Band. The buttons are color coded, and each has a different feel, although you can put a clear or felt pad on one to help distinguish the difference. The Pocket Wizard can be easily placed in a waist pouch, and using the quick disconnect, you don't have to unsnap the Switch Band to get all unhooked!
E-mail me with questions, or to order and have me make one for you NOW!
First time e-mailing? Please tell me your city, state, and country, and how you got to me if you would like me to answer your question. Thanks for understanding!
PayPal accepted to this e-mail address, or ask for an Invoice
Don't forget that you also need a Pre-Trigger Cable to connect the receiver to the camera. Only one S/H charge when both are ordered together (or when included in a flash mod order) !
Pocket Wizard Plus II Users:
...Continuous or burst mode is not supported
...Single shot mode works just fine!
Explanation:
...This is because of the auto-transceiver function of the Plus II design (and only this model), an attempt by PW to make the relay function of the MultiMax model easier to use. The MultiMax model works correctly in burst mode when a Trigger Switch press is applied to port 1, while in the Plus II model, the port 1 jack auto switches to an "output" immediately after a switch press so the auto-relay function can happen more easily. It is this auto switch to output mode of the port 1 that prevents a continuous firing in burst mode. The solution is to only take one picture at a time, or use a MultiMax for the transmitter!
More Info in FAQ Section
...This explanation, and another by MAC (Pocket Wizard)...
Lens Mounted Trigger Setups:
(Click to see larger image in a separate window)
Wrap single band around shoe to make this a foot actuated trigger!

Purchase Info
E-mail me with questions, or to order and have me make something for you NOW!
Send funds via PayPal to this e-mail address -
Or ask, and I will send an invoice,
Or click on logo below, then fill in amount including S/H
(Log in, or press Continue to pay without a log in)
CLICK BOX BELOW TO PAY:
(Include shipping address in special instructions)
Saturday, September 29, 2007

Fine Print: Insurance, Int'l Shipping, etc
Insurance, loss or damage: It is the full responsibility of the buyer to request and pay additional charges for all insurance. Although lost, missing, or damaged shipments are rare, the buyer assumes full responsibility for uninsured or underinsured shipments.
International Shipments: All international shipments should be insured for the full value of the merchandise. All fees related to customs, duties, taxes, etc., are beyond our control. We also have no control over the time your package spends in customs. Tracking numbers are often unreliable, and your package often arrives before the tracking number shows any meaningful information.
The Fine Print:
I want you to be satisfied with your purchase or custom project, and every effort will be made in that regard. Custom items, prototype work, and S/H charges are not eligible for credit or refund. Please understand that many of these items are still in the testing stages, and may or may not exactly suit your needs. Every effort is made to accurately represent these items. If you have questions about whether a particular item will work for you, please ask for my assessment.
Thursday, August 2, 2007


Tuesday, July 31, 2007
Design Glitch with Pocket Wizard Plus II - Remote Camera Setup - Burst Mode
This first came to light when a couple of photogs started seeing erratic behavior when using my Lens Mounted Trigger Cable, and noticed erratic behavior of the remote camera not being able to take a burst of images (they could take single images only). After some phone troubleshooting, they sent the unit back to me for some bench testing, and naturally it worked just fine for me in both single image and burst mode (I have the MultiMax model of the PW). Further analysis revealed it was the Plus II model that was causing the erratic behavior.
As it turns out, on the Plus II model, the "Test" button operates differently from the input port #1, which on previous models like the MultiMax, is called "Camera/Port 1". On the previous models, the "Test" button, and this port 1 operate in an identical fashion. This difference is not made clear in the Plus II manual.
Where and when is this even an issue, you ask?
Well, on the MultiMax and transmitter models other than the Plus II, if you plug any kind of manual tripper switch into port 1 (ie: my Lens Mounted Trigger, my Stick-On Trigger, my Manual Tripper, Paramount's manual tripper, or any momentary action push button switch), and depress the switch to make a momentary electrical contact (close the circuit), the PW (transmitter) will transmit a signal for as long as you hold the switch closed. This same action will occur when pressing the "Test" button. On the Plus II model, this doesn't happen because the Plus II will immediately switch to receiver mode and listen for a receive signal.
The following is from a recent FAQ on my site addressing this problem:
Q: I can't get the Lens Mounted Trigger or Stick-On Trigger to fire my remote camera in burst or continuous mode, but only in single shot mode, why?
A: This is because of the auto-transceiver function of the Pocket Wizard Plus II design (and only this model), an attempt by PW to make the relay function of the MultiMax model easier to use. The MultiMax model works correctly in burst mode when a Trigger Switch press is applied to port 1, while in the Plus II model, the port 1 jack auto switches to an "output" immediately after a switch press so the auto-relay function can happen more easily. It is this auto switch to output mode of the port 1 that prevents a continuous firing in burst mode. The solution is to only take one picture at a time, or use a MultiMax for the transmitter!
The following is a quote from Garry Montalbano, of The MAC Group of LPA Design (Pocket Wizard):
"This is a limitation of the Plus II. A button plugged into PORT 1 will not behave like holding down the TEST button. Technical reasons include:
*** The PORTS perform different functions based on auto-transceiver operation. PORT 1 cannot be an input and an output at the same time, so when the unit is triggered, it switches to output so auto-relay can happen more gracefully.
*** When PORT 1 is used as a camera input for remote flash triggering it is very beneficial for it to be "single shot" so you don't get multiple flashes when using a Hasselblad with mechanical lens contacts, for example.
Solutions to this specific problem include:
* Use the TEST button
* Use a MultiMAX as the Transmitter
* Use a MultiMAX as a Receiver and use a long contact time so that every trigger performs 5 shots, for example."
The only real solution to this problem (if it is even a problem for you), is to use the MultiMax model for the transmitter, and then any other model for the receiver to trigger the camera.
With the price of the Plus II models being less than the MultiMax models, the Plus II's seem to be flying off the shelves. It seems people should be made aware of the limitations of this model at some point before they try to use burst mode through a remote setup triggerred through the port #1.
Subscribe to:
Posts (Atom)